
Results 1 to 6 of 6
 4Likes
Thread: Picture posting tutorial
 LinkBack URL
 About LinkBacks
-
12-15-2021, 10:42 AM #1Senior Member


- Join Date
- Apr 2012
- Posts
- 254
- Thanks
- 0
- Thanked 128 Times in 76 Posts
Picture posting tutorial
Seeing so many people having problems posting pics, here's a "tutorial"--this is for posting pics from a computer. Many hosting sites have an app you can use to post pics from a phone, though; I don't use my phone to post pics so I don't use any of the apps. If there's pic on my phone I want to post, I'll email it to myself and upload when I have access to my laptop. But, the same hosting sites can be used on your web browser on your phone.
I use www.imgbox.com to post pics. Open the site in another window and keep GSPFF open also
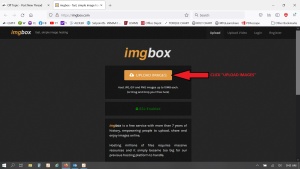
1---Go to www.imgbox.com and click "UPLOAD IMAGES"
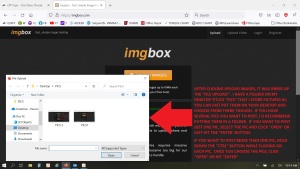
2---This will lead you to choosing the pics you want to post. I make a folder on my desktop for pictures and store them there (you may store yours somewhere else on your computer). Choose the pics you want to post and click enter or open
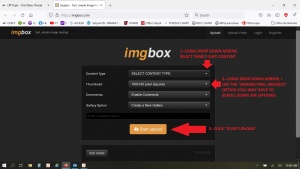
3---You have a couple of options on the next screen you need to choose (don't worry about the comments or gallery options blocks)
4---Once pictures are uploaded, you'll see a page like this. Click on the link in the BB-Code block; it will highlight blue. Once highlighted blue, right click and click on COPY
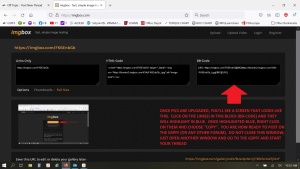
Only 5 pics are allowed to be posted in each post. If you have more, you'll have to reply to your post in order to post more pics in that thread.
-
-
12-15-2021, 10:42 AM #2Senior Member
- Join Date
- Apr 2012
- Posts
- 254
- Thanks
- 0
- Thanked 128 Times in 76 Posts
5---Once you have copied the link in the BB-Code block, come back to GSPFF and start your post. Right click in the reply block and click PASTE. The link you copied from the imgbox page in step 4 will paste here. Once you finish making your post, click the SUBMIT NEW THREAD button at the bottom and your post will appear
 Pier#r likes this.
-
The Following User Says Thank You to hammerhead For This Useful Post:
-
12-15-2021, 10:49 AM #3We are there! Let's go fishing!!

- Join Date
- Oct 2011
- Location
- Born, bred and someday dead in Midtown Mobile, AL
- Posts
- 10,179
- Thanks
- 7,950
- Thanked 13,519 Times in 3,999 Posts
- Blog Entries
- 6
Caveat: as you see in the first post above, there is a limit of 4 picture attachments per post.
-
12-15-2021, 11:52 AM #4Senior Member
- Join Date
- Dec 2017
- Location
- Auburn AL
- Posts
- 319
- Thanks
- 35
- Thanked 382 Times in 110 Posts
Ok, working through the tutorial. Which size is best to choose?
-
12-15-2021, 12:11 PM #5We are there! Let's go fishing!!
- Join Date
- Oct 2011
- Location
- Born, bred and someday dead in Midtown Mobile, AL
- Posts
- 10,179
- Thanks
- 7,950
- Thanked 13,519 Times in 3,999 Posts
- Blog Entries
- 6
I don't think it matters because the forum automatically resizes the pictures.
-
12-15-2021, 12:24 PM #6Senior Member
- Join Date
- Apr 2012
- Posts
- 254
- Thanks
- 0
- Thanked 128 Times in 76 Posts
I use the 300x300 (resized) option...it's big enough that you can see what is in the pic, but still small enough for most forums. Also, you can click on the picture and it will open it up in normal size through imgbox Originally Posted by SteveH
 Pier#r likes this.
-
The Following User Says Thank You to hammerhead For This Useful Post:


 Reply With Quote


This is a clean, new, Fish-n-Mate "Junior" model, all aluminum cart. Most popular brand, with 5 rod holders, ruber pnuematic tires and bait table/basket. Never used. Save over retail. Asking $185...
New, Fish-n-Mate "Junior" Fishing...